

There are some cookies that just belong in the world.
Peanut butter blossoms are one of them.
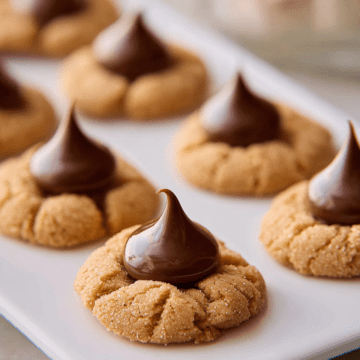
That soft, slightly chewy peanut butter base. The little chocolate crown pressed right into the center while the cookie is still warm. The sugar-sparkled edges that catch the light on any dessert table. I have been making these since I was barely tall enough to reach the counter, and honestly? They never get old.
The best part is that these cookies look like you put in serious effort. But the truth is, you probably already have everything you need sitting in your pantry right now.

No fancy equipment. No complicated techniques. Just a mixer, a couple of bowls, and about 25 minutes of your time.
Let me walk you through every single step.
Before You Start: A Few Things Worth Knowing
I know it is tempting to just jump straight into mixing. But spending two minutes reading this section will save you from the most common peanut butter blossom mistakes.
First, your peanut butter matters more than you think.
Please do not use natural peanut butter for this recipe. I have tried it. The cookies spread out flat, turn oily, and completely fall apart. Natural peanut butter separates and throws off the entire texture of the dough. Stick with a standard commercial creamy peanut butter like Jif or Skippy. Those contain stabilizers that keep your dough smooth and cohesive.
Second, your butter needs to be properly softened.
Not melted. Not cold. Softened. Pull it out of the fridge about an hour before you plan to bake. When you press a finger gently into the stick, it should leave a slight indent without the butter feeling greasy or shiny. Melted butter will make your cookies spread completely flat. We want thick, chewy blossoms here.
Third, do not skip the brown sugar.
The combination of both granulated and brown sugar is what gives these cookies their signature chew. The molasses in brown sugar adds a gentle caramel warmth and keeps the centers soft for days. Granulated sugar alone makes cookies too crisp. You need both.
Quick Look at the Recipe
| Detail | Info |
|---|---|
| Prep Time | 15 minutes |
| Cook Time | 10 minutes |
| Total Time | 25 minutes |
| Servings | 36 cookies |
| Difficulty | Easy |
Let’s Make the Dough
Start by preheating your oven to 375°F. Line two large baking sheets with parchment paper and set them aside.
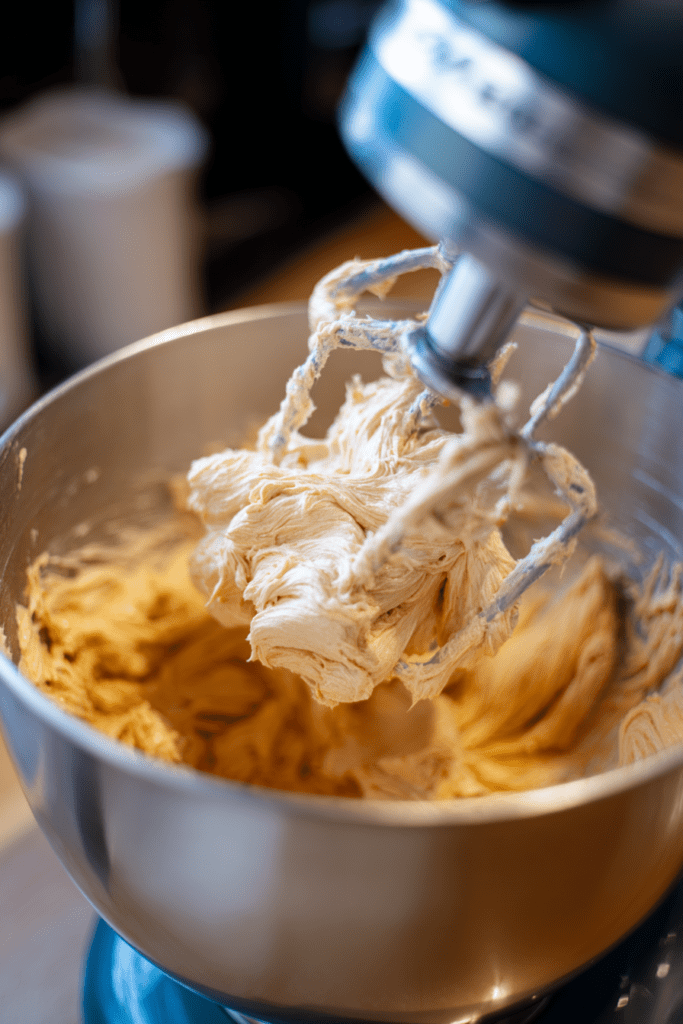
Now, grab your stand mixer or hand mixer. Add the softened butter and creamy peanut butter into the bowl. Pour in both the granulated sugar and the packed brown sugar. Add the salt right now too.
Turn the mixer to medium speed and let it run for about two to three full minutes.
This part is important. You are not just combining ingredients here. You are beating air into the mixture, which gives the cookies a lighter, more tender crumb. When it is ready, the mixture should look noticeably pale, almost fluffy, and smell absolutely incredible.
Next, crack your room-temperature egg into the bowl and pour in the vanilla extract. Beat everything on medium until it is fully combined and smooth. Then stop the mixer, grab a rubber spatula, and scrape down the sides and bottom of the bowl. You would be surprised how much dense butter hides down there.
In a separate bowl, whisk together the flour and baking soda. Add this dry mixture into your wet ingredients slowly, with the mixer on its lowest speed. Mix just until the white flour streaks disappear.
Stop right there.
Overmixing is one of the most common cookie mistakes people make. The more you mix after the flour goes in, the tougher and denser your cookies become. The dough should feel soft, slightly tacky, and very easy to handle.
Rolling and Sugar Coating
This is honestly the most satisfying part of the whole process.
Scoop up a small portion of dough and roll it between your palms into a smooth ball, roughly one inch in diameter. Think about the size of a large grape. That is your target.
Pour some extra granulated sugar into a small shallow bowl. Drop the dough ball in and roll it around until every single surface is coated. That sugar crust is what gives peanut butter blossoms their signature sparkle and that subtle crunch on the outside.
Place each sugar-coated ball onto your prepared baking sheets, leaving about two inches of space between each one. They spread a little as they bake.
One tip before you pop them in the oven: unwrap all 36 chocolate kisses before you start baking. I cannot tell you how many times I have been wrestling with foil wrappers while my cookies are sitting hot on the pan, waiting. Do yourself a favor and get it done ahead of time.
Baking and the Big Moment
Slide one baking sheet into the oven and bake for 8 to 10 minutes.
You are watching for the cookies to puff up slightly and look just barely set in the center. The bottoms should be just starting to turn golden. They will look a little underdone. That is perfectly fine. They continue cooking from the residual heat of the pan.
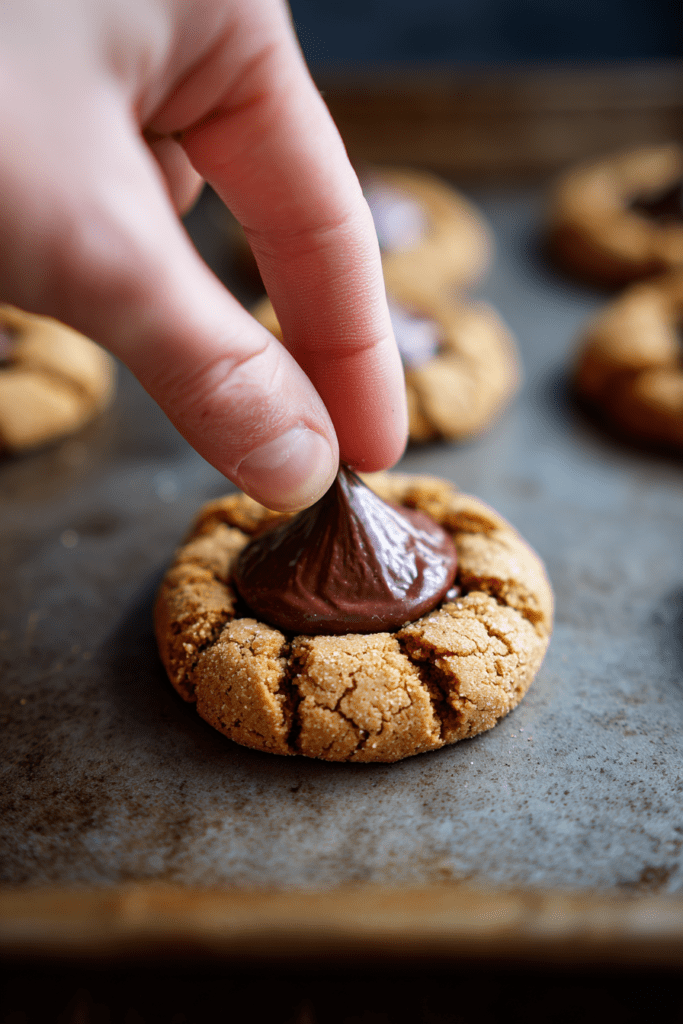
Pull the baking sheet out of the oven immediately.
Now move fast. While the cookies are still piping hot, press one unwrapped chocolate kiss firmly into the center of each cookie. You will see the edges crack and spread outward slightly. That cracked look is exactly what you want. It is the hallmark of a perfect peanut butter blossom.
The heat from the cookie will slightly melt the bottom of the chocolate, which helps it bond and stay in place as everything cools.
Leave the cookies on the pan until the chocolate feels completely firm again before moving or stacking them.
Three Pro Tips I Always Use
Tip 1: Weigh your flour.
Measuring flour with a cup is notoriously inconsistent. Scooping directly from the bag packs the flour down and you end up using far more than the recipe intends. Too much flour means dry, crumbly cookies. A kitchen scale takes all the guesswork out. You are aiming for exactly 180 grams.
Tip 2: Chill the dough if your kitchen is warm.
If it is a hot day or your kitchen runs warm, the butter in the dough softens quickly and the dough gets sticky and hard to roll. Just pop the bowl in the fridge for about 20 minutes. It firms right back up and rolling becomes effortless.
Tip 3: Pull the cookies out before they look done.
This sounds counterintuitive. But slightly underbaked cookies finish cooking on the hot pan. If they look perfectly done in the oven, they will be overbaked by the time they cool. Soft and puffy when you pull them out is your goal.
Your Questions, Answered
Can I make the dough ahead of time?
Yes, and it actually works great. The dough keeps in an airtight container in the fridge for up to three days. Pull it out and let it sit at room temperature for about ten minutes before rolling. You can also freeze the raw dough balls for up to three months. Bake straight from frozen, just add a couple of extra minutes.
Why are my cookies dry and crumbly?
Almost always, this comes down to too much flour or overbaking. Measure carefully, use a scale if you have one, and pull those cookies out while they still look slightly underdone.
Can I freeze the baked cookies?
Absolutely. Once the chocolate is completely set and the cookies are fully cooled, layer them in a freezer-safe container with parchment between each layer. They keep well for about two months.
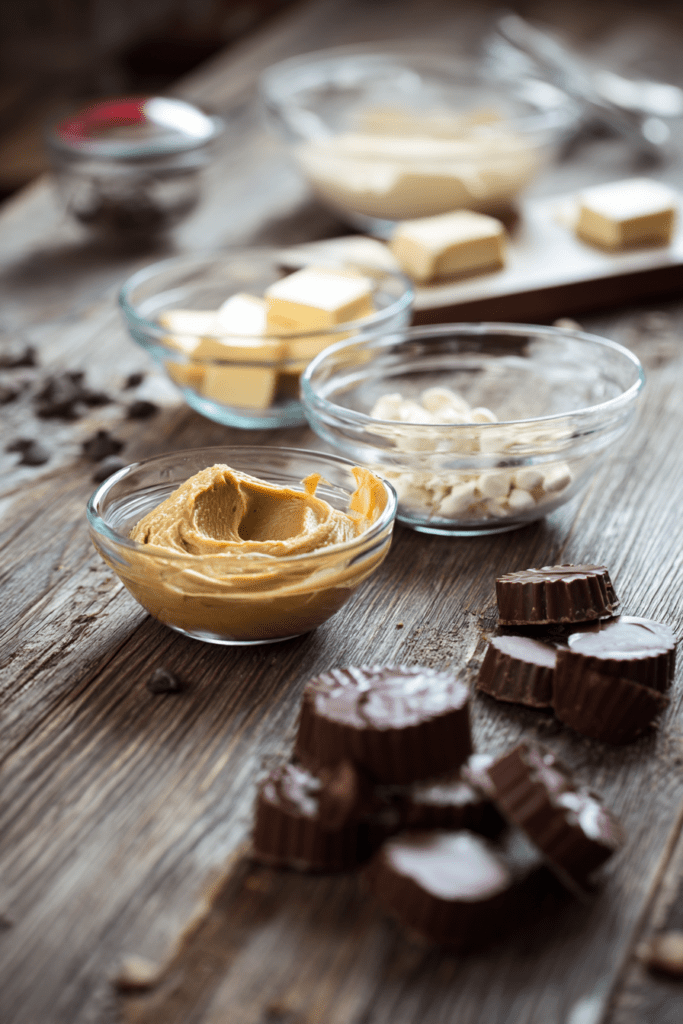
Do I have to use standard chocolate kisses?
Not at all. The classic Hershey’s kiss is traditional, but these cookies are a great canvas for experimenting. Try:
- Miniature peanut butter cups for a full peanut butter experience
- Dark chocolate squares for a less sweet, more intense finish
- Caramel-filled chocolates for something a little unexpected
- White chocolate kisses for a completely different flavor profile
How do I store leftovers?
Room temperature, in a sealed airtight container. They stay soft and fresh for up to one week. Skip the refrigerator entirely. Cold air dries them out faster than you would expect.
Storage and Make-Ahead Cheat Sheet
| Situation | Method | How Long |
|---|---|---|
| Room temperature storage | Airtight container on counter | Up to 1 week |
| Refrigerating raw dough | Airtight container in fridge | Up to 3 days |
| Freezing raw dough balls | Freezer bag or container | Up to 3 months |
| Freezing baked cookies | Layered with parchment, sealed | Up to 2 months |

Peanut butter blossoms are the kind of cookie that disappears fast. Every single time I bring them somewhere, I come home with an empty plate and at least three people asking for the recipe.
Now you have it. Go bake a batch.
Classic Peanut Butter Blossoms
Ingredients
Wet Ingredients
- 1/2 cup butter properly softened, not melted
- 1/2 cup creamy peanut butter commercial brand like Jif or Skippy
- 1/2 cup granulated sugar plus extra for rolling
- 1/2 cup brown sugar packed
- 1 egg room temperature
- 1 tsp vanilla extract
Dry Ingredients
- 180 grams all-purpose flour
- 1 tsp baking soda
- 1/2 tsp salt
The Crown
- 36 chocolate kisses unwrapped
Instructions
- Preheat oven to 375°F. Line two large baking sheets with parchment paper.
- Beat softened butter, peanut butter, granulated sugar, brown sugar, and salt on medium speed for 2-3 minutes until pale and fluffy.
- Add the egg and vanilla extract; beat until fully combined and smooth. Scrape down the bowl.
- Whisk flour and baking soda in a separate bowl. Slowly add to the wet ingredients on low speed, mixing just until white streaks disappear.
- Roll dough into 1-inch balls. Roll each ball in extra granulated sugar to coat completely.
- Place on baking sheets 2 inches apart. Bake for 8 to 10 minutes until puffed and barely set.
- Immediately press a chocolate kiss into the center of each hot cookie. Let cool on the pan until the chocolate is firm.