
You know that moment when butternut squash comes out of the oven?
The edges are caramelized and crispy. The center is soft and almost creamy. Pure magic.
I’ve been making this recipe for years. And honestly? It never gets old.
Here’s what blows my mind every time.
You only need four ingredients. That’s it. But the taste? It’s like you spent hours in the kitchen. The natural sugars caramelize during roasting. Those crispy edges? Everyone fights over them.
Why Roasting Beats Every Other Method
I’ve tried them all.
Steaming makes butternut squash mushy. Boiling just washes away all the good stuff. But roasting?
That’s where things get interesting.
The dry heat does something special. It concentrates the sweetness. Those gorgeous brown spots develop. Your kitchen smells incredible.
Think about it like this:
Raw butternut squash is bland. Kind of starchy. Nothing special.
But after 30 minutes in a hot oven?
Sweet. Nutty. Completely addictive.
The heat breaks down those complex starches into simple sugars. Science is pretty cool sometimes.
My Sunday Ritual
This has become my meal prep staple.
Every Sunday, I roast two large squashes. They last the entire week in my fridge. Five days, easy.
Here’s how I use them:
- Toss into grain bowls for lunch
- Blend into creamy soups
- Reheat as a quick side dish
- Mix with pasta for easy dinners
One batch = dozens of different meals.
Pasta with sage butter? Check. Hummus with a seasonal twist? Yep. Layered into lasagna? Absolutely.
The possibilities don’t stop.
New to Cooking? This Recipe Has Your Back
Listen.
Even if you’ve never roasted anything before, you’ll nail this. The ingredients are minimal. The technique is straightforward. No complicated knife work. No precise timing that’ll stress you out.
Your cubes don’t need to be perfect. Really.
I’ve made this recipe countless times. Each batch turns out a bit different. Sometimes bigger pieces. Sometimes smaller. My oven temperature varies.
But you know what?
It always tastes good.
The principle is simple: high heat + quality ingredients = fantastic results.
What Makes This Version Different
You’re probably wondering what sets this apart from other recipes out there.
The secret?
Restraint.
I use only salt, pepper, and olive oil. That’s the whole list. This minimalist approach lets the squash do its thing.
Too many recipes bury butternut squash under heavy spices. Or they add unnecessary sweet stuff.
But here’s the truth:
The natural flavor is incredible on its own.
A bit of salt brings out the sweetness. Pepper adds subtle warmth. Olive oil creates that beautiful caramelization.
You don’t need anything else.
What You’ll Need
| Ingredient | Quantity | Notes |
|---|---|---|
| Butternut squash | 1 medium (about 2-3 lbs) | Peeled, seeded, and cubed into 1-inch pieces |
| Extra-virgin olive oil | 2-3 tablespoons | For drizzling; use quality oil |
| Sea salt | ½-1 teaspoon | Adjust to taste |
| Black pepper | ¼ teaspoon | Freshly ground preferred |
| Fresh parsley | 2 tablespoons | Optional garnish, chopped |
Recipe Timing:
Prep Time: 10 minutes | Cook Time: 30-35 minutes | Total Time: 40-45 minutes
Servings: 4 | Difficulty: Easy
Let’s Get Cooking (Step-by-Step)
I’m going to walk you through every step. The techniques that work every single time.
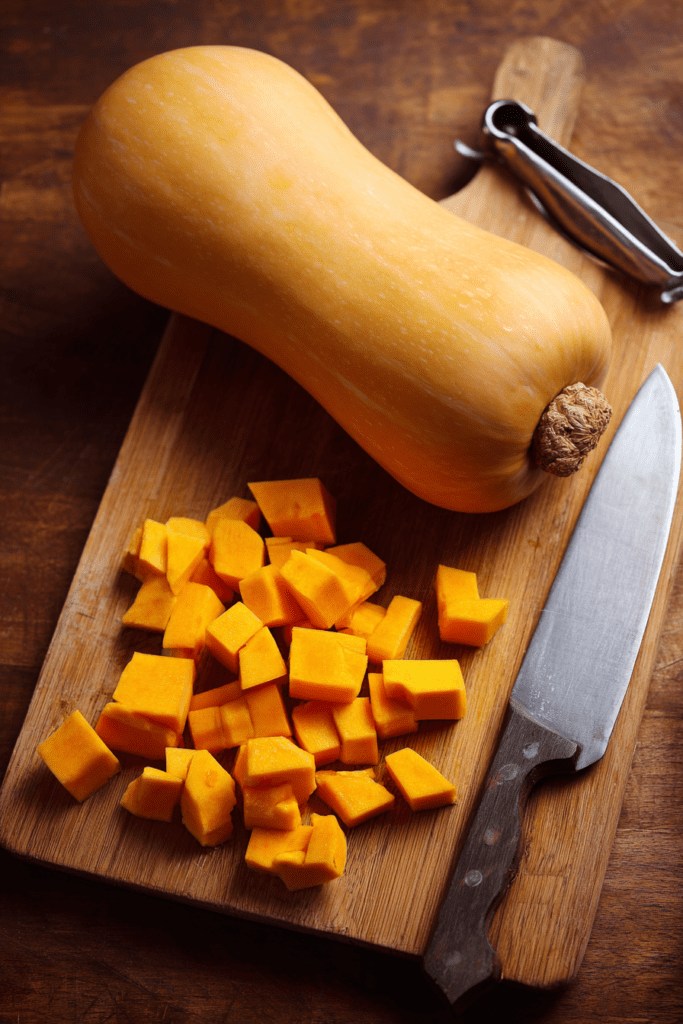
Breaking Down Your Butternut Squash
The hardest part? Breaking down this tough vegetable.
But don’t worry. It’s easier than it looks.
First things first: create a stable cutting surface. Grab a damp kitchen towel. Put it under your cutting board. This stops everything from sliding around.
Now take your sharpest chef’s knife.
Trim both ends of the squash. This gives you flat surfaces. Much more stable.
Stand the squash upright. Carefully slice downward. Remove the skin in long strips. Work slowly here. Keep your fingers away from the blade.
Some people swear by vegetable peelers. I prefer a knife. More control. The skin comes off in these satisfying ribbons.
Take your time with this step.
Good prep work makes everything else easier.
The Seeding Process
After peeling, cut the squash in half lengthwise.
See that bulbous bottom part? That’s where all the seeds hang out.
Grab a sturdy spoon. Scrape them out completely. Get into those corners where seeds like to hide.
Here’s a trick I learned years ago:
Save those seeds.
Rinse them off. Toss with a bit of oil and salt. Roast them separately at 350°F for about 15 minutes.
They make the most amazing crunchy snack. Trust me on this.
Now dice the flesh into uniform cubes. Aim for one-inch pieces.
They don’t need to be perfect. But similar sizing helps everything cook at the same rate. The neck section is way easier to cube than the round bottom part.
Time to Roast
Preheat your oven to 400°F.
This temperature is crucial. Here’s why:
Too low? The squash steams instead of roasting. Too high? The outside burns before the inside cooks.
400°F is the sweet spot.
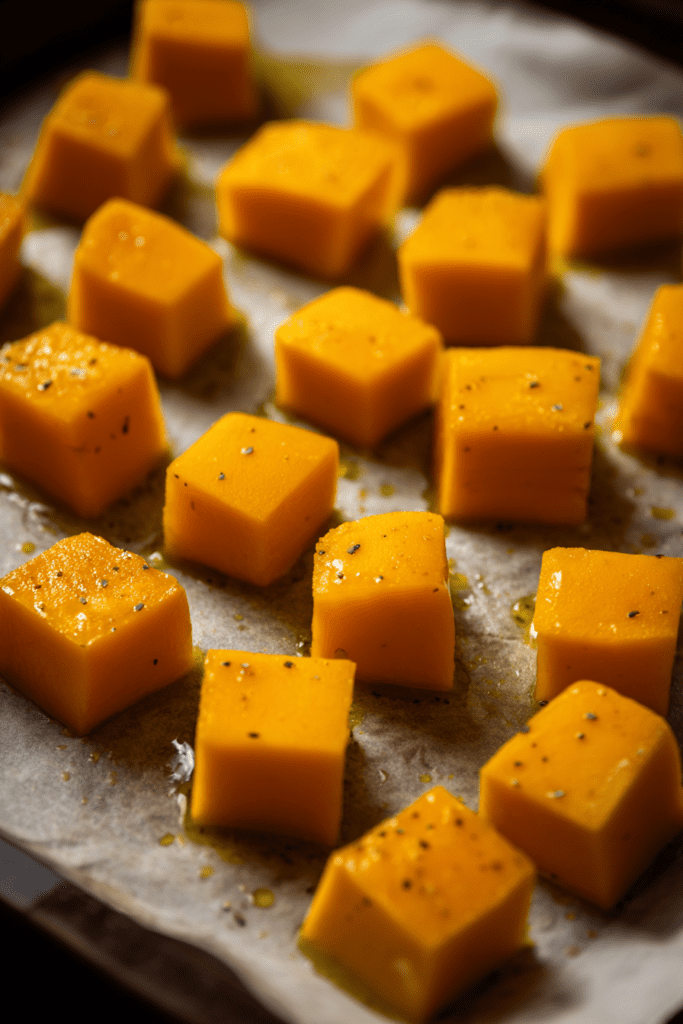
Line a large baking sheet with parchment paper. This prevents sticking. Also makes cleanup a breeze.
Spread your cubed squash across the pan. Single layer. Give each piece some breathing room.
Crowding is the enemy here. It causes steaming instead of roasting.
Drizzle olive oil generously over everything. I use about three tablespoons for one medium squash.
Here’s what I do:
Use your hands. Toss everything together. Make sure each cube gets coated with oil. This is what creates those crispy edges we’re after.
Season with salt and pepper. I’m pretty generous with salt. It enhances the natural sweetness. Freshly cracked pepper adds this nice aromatic quality.
The Waiting Game
Slide the pan into your preheated oven.
Set a timer for 30 minutes.
At the 15-minute mark, open the oven. Give everything a good stir. This ensures even browning on all sides.
Now here’s what you’re watching for:
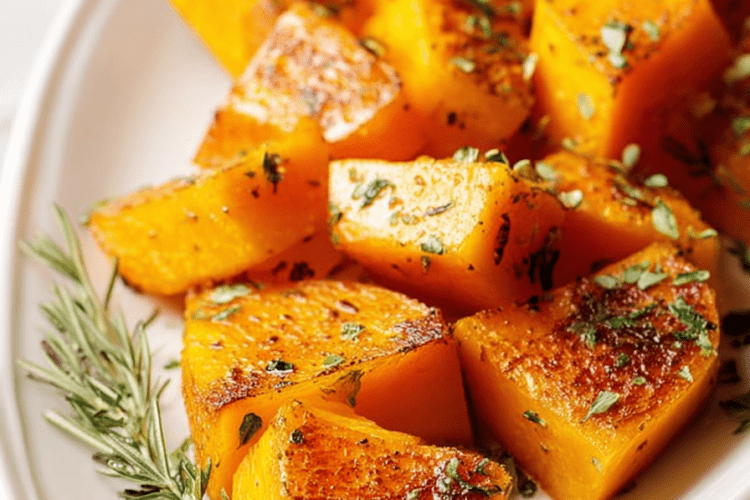
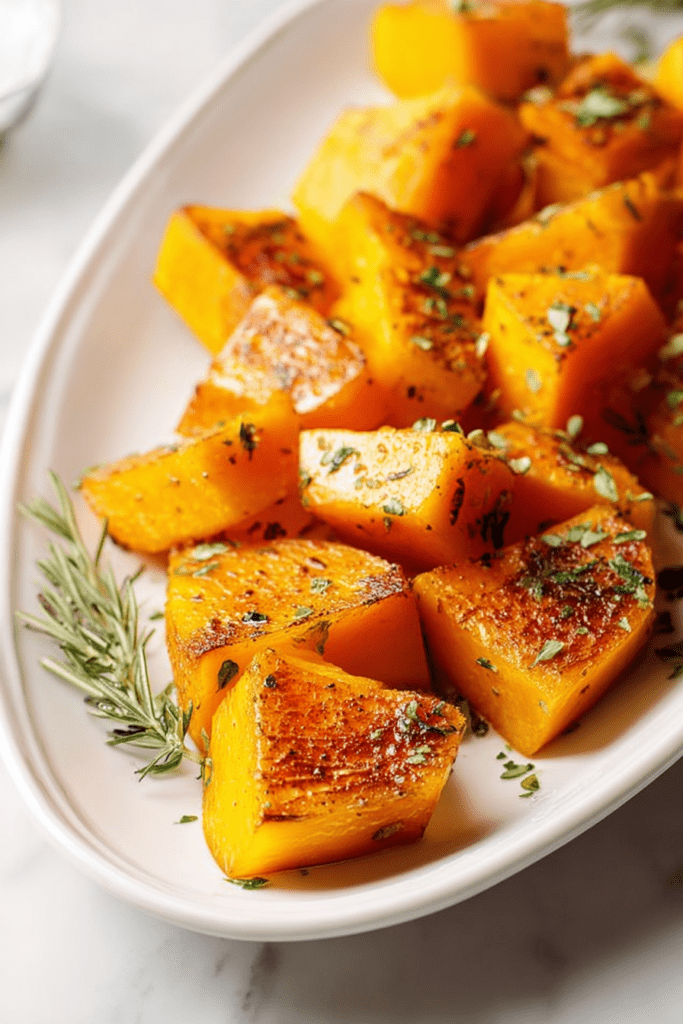
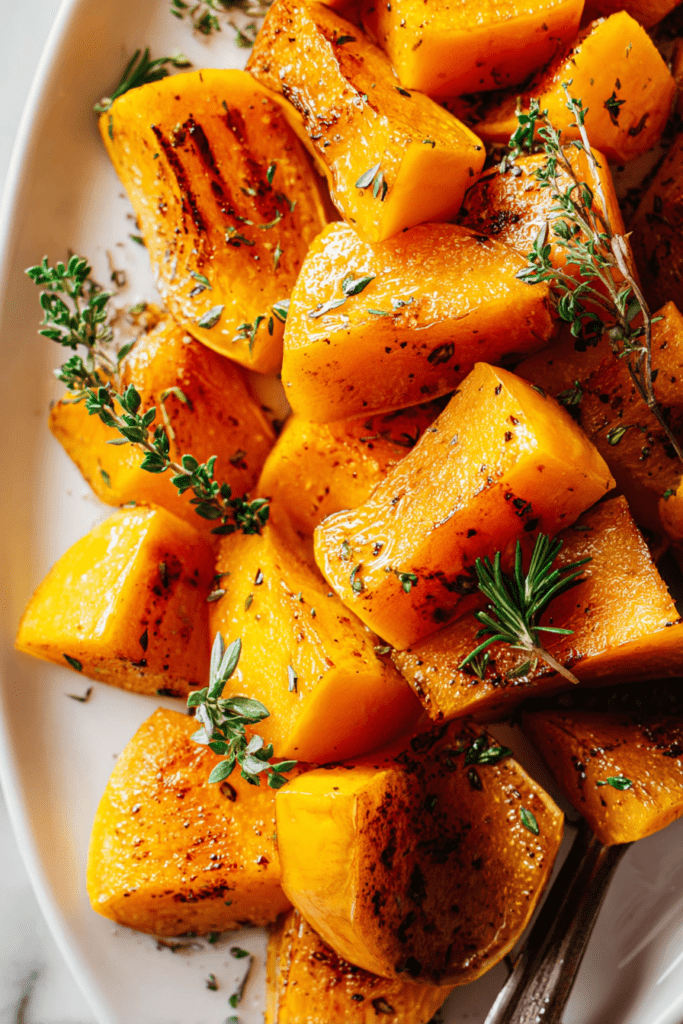
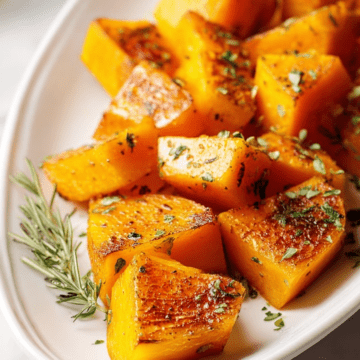
The edges should turn golden brown. Slightly crispy. The flesh should be fork-tender but not falling apart.
Depending on your oven and cube size, this takes 30 to 35 minutes.
Those Final Touches
Remove the pan when the squash hits that perfect golden color.
Let it rest for a few minutes. The cubes will firm up slightly as they cool.
Using parsley? Sprinkle it over the hot squash right before serving. The residual heat wilts the herbs slightly. Releases that fresh aroma.
I also like adding a final pinch of flaky sea salt. The texture contrast is chef’s kiss.
Storing Leftovers
Cool the leftover squash completely. Then transfer to an airtight container.
In the fridge, it lasts up to five days.
For reheating, use a skillet over medium heat. Add a bit of oil or butter. This restores some of that crispy exterior. The microwave works too. But the texture won’t be quite as nice.
Want to store it longer?
Freeze the cooled squash in freezer bags. It keeps for three months. Thaw overnight in the refrigerator before using.
How to Serve This Versatile Side
This dish goes with everything.
I mean it.
Weeknight roasted chicken? Perfect pairing. Grilled fish? Absolutely. Pork chops? You bet.
For vegetarian meals, it adds serious substance to grain bowls and salads.
Here’s one of my favorite ways to use it:
Toss with cooked pasta. Add fresh sage. Splash in a bit of pasta water. The starchy water creates this light sauce that clings to everything. Throw in some toasted pine nuts and parmesan.
Boom. Elegant dinner.
I also love blending roasted squash into creamy soups. The caramelized flavor adds depth you simply can’t get with raw squash.
Want to try something different?
It makes incredible risotto. Stir the cubes in during the last few minutes of cooking.
Mix It Up (Flavor Variations)
The basic recipe is perfect as-is.
But sometimes I like to switch things up.
Herb lovers: Add rosemary or thyme before roasting. The aroma fills your entire kitchen.
Smoky version: Sprinkle smoked paprika over everything. Subtle but noticeable.
Middle Eastern twist: Toss the roasted squash with cumin and coriander. Squeeze fresh lemon over the top. Drizzle with tahini. The flavor combo is unreal.
Sweet variation: Light drizzle of maple syrup. Pinch of cinnamon. Add toasted pecans for crunch. Perfect for holiday dinners.
Don’t Make These Mistakes
Mistake #1: Cutting cubes too small.
Tiny pieces turn mushy. They lose their shape completely. Stick with one-inch cubes.
Mistake #2: Flipping the squash constantly.
Resist this urge. Let it sit undisturbed for the first 15 minutes. This allows proper caramelization to happen.
Your Questions Answered
Can I leave the skin on?
Technically, yes. But I don’t recommend it.
The skin becomes leathery when roasted. Not pleasant to eat. Peeling takes a few extra minutes. But it makes a huge difference in the final texture.
How do I know when it’s done?
Look for golden-brown edges. Test with a fork.
The flesh should be tender but still hold its shape. Falling apart? You’ve gone a bit too long. Still hard? Give it another 5-10 minutes.
Can I use a higher temperature?
You can roast at 425°F for faster cooking. But watch it carefully.
Things can burn quickly at that heat. I find 400°F gives the most consistent results with perfect caramelization.
Best way to reheat leftovers?
A skillet beats everything else.
Heat a bit of oil or butter over medium heat. Add the cold squash. Stir occasionally until heated through. This method brings back some of that crispy exterior.
Why is my squash soggy instead of crispy?
Usually two reasons:
The pan is overcrowded. Or the oven temperature is too low.
Make sure there’s space between cubes. Your oven needs to be fully preheated to 400°F. Also? Using too much oil can cause sogginess.
My Final Thoughts
Roasted butternut squash has earned its spot as a fall favorite in my kitchen.
The preparation is simple. The flavor is incredible. The versatility? Unmatched.
I return to this recipe again and again. Whether it’s a side dish for Tuesday night dinner or part of a holiday spread, this technique never lets me down.
The beauty lies in its simplicity.
No fancy techniques. No expensive ingredients. Just good squash, quality olive oil, and a hot oven.
That’s it.
Get this recipe down, and you’ll have a reliable dish for everything. Casual weeknights. Holiday gatherings. Sunday meal prep.
I hope this guide helps you nail perfect roasted butternut squash every time.
Now go enjoy those sweet, caramelized results.
Easy Roasted Butternut Squash
Ingredients
- 1 medium butternut squash about 2-3 lbs, peeled, seeded, and cubed into 1-inch pieces
- 2-3 tablespoons extra-virgin olive oil for drizzling; use quality oil
- 1/2-1 teaspoon sea salt adjust to taste
- 1/4 teaspoon black pepper freshly ground preferred
- 2 tablespoons fresh parsley optional garnish, chopped
Instructions
Prep the Butternut Squash
- Preheat your oven to 400°F (200°C). Line a large baking sheet with parchment paper.
- Place a damp kitchen towel under your cutting board to create a stable cutting surface. Using a sharp chef’s knife, trim both ends of the squash to create flat surfaces.
- Stand the squash upright and carefully slice downward to remove the skin in long strips. Work slowly and keep your fingers away from the blade.
- Cut the squash in half lengthwise. Using a sturdy spoon, scrape out all the seeds completely from the bulbous bottom part.
- Dice the flesh into uniform 1-inch cubes. Similar sizing helps everything cook at the same rate.
Roast the Squash
- Spread the cubed squash across the prepared baking sheet in a single layer. Give each piece some breathing room to prevent steaming.
- Drizzle olive oil generously over the squash. Use your hands to toss everything together, making sure each cube gets coated with oil.
- Season generously with salt and freshly cracked pepper.
- Roast in the preheated oven for 30-35 minutes. At the 15-minute mark, open the oven and give everything a good stir to ensure even browning on all sides.
- The squash is done when the edges turn golden brown and slightly crispy, and the flesh is fork-tender but still holds its shape.
- Remove from the oven and let rest for a few minutes. If using parsley, sprinkle it over the hot squash right before serving. Add a final pinch of flaky sea salt if desired.