
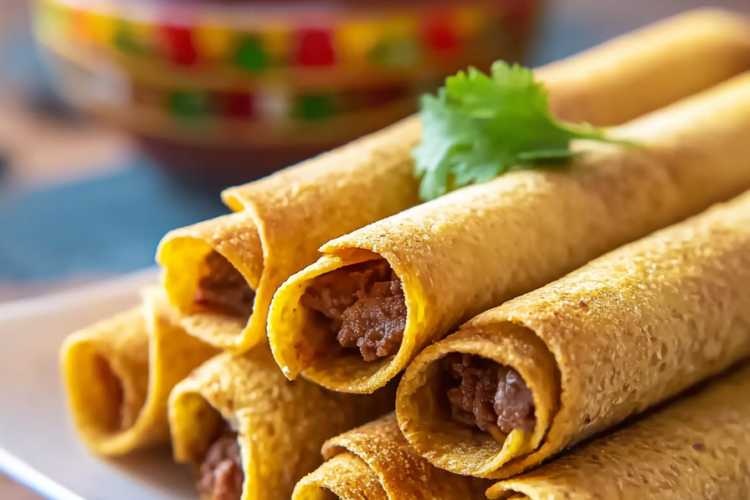
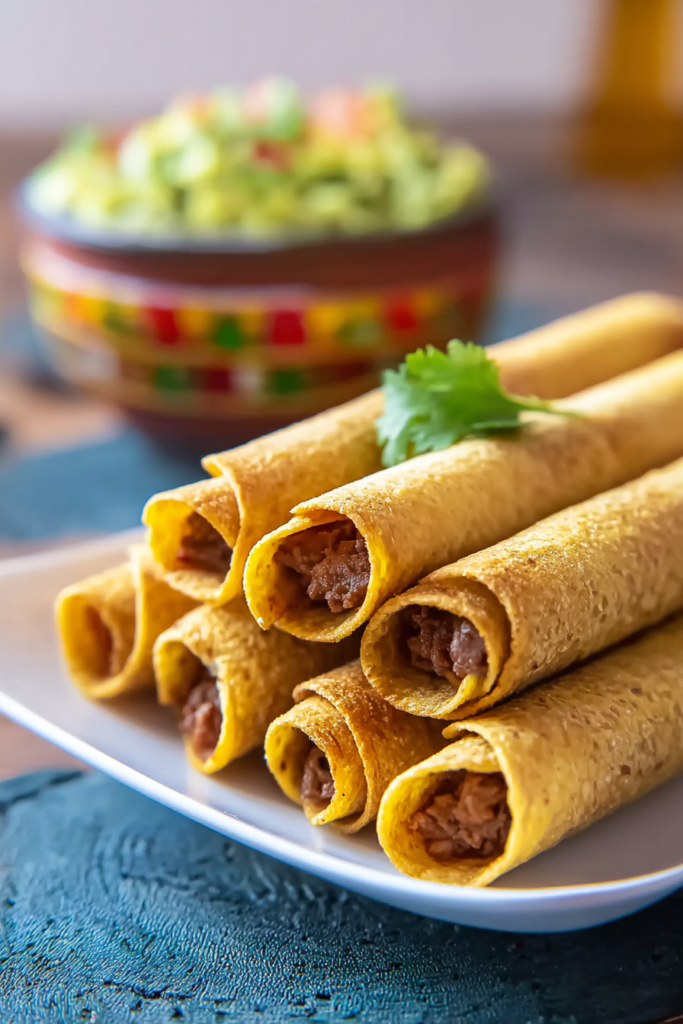
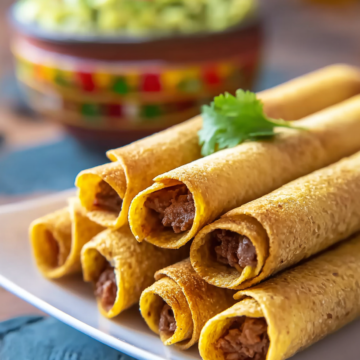
Crispy, cheesy, and packed with slow-roasted beef. Your new freezer staple.
| Prep Time | Cook Time | Total Time | Servings | Difficulty |
|---|---|---|---|---|
| 20 min | 3 hrs 30 min | ~4 hrs | 48 taquitos | Intermediate |
Some recipes just earn a permanent spot in your kitchen. This is one of them.
I stumbled onto this recipe years ago. I had a big roast in the fridge and absolutely no dinner plan. What I threw together that evening completely changed how I approach meal prep.
Here’s the basic idea. You slow-cook a well-seasoned roast until it falls apart. Then you mix that deeply flavored beef with cheese, a little salsa, and fresh onion. Roll it all up in corn tortillas. Fry or bake until everything turns golden and crispy.
That’s it. Simple concept. Incredible results.
This recipe makes 48 taquitos. I know that sounds like a lot. But they disappear faster than you’d think. I always freeze half the batch for busy weeknights or unexpected guests. Once you’ve made these from scratch, the frozen store-bought kind will never cut it again.
What Makes This Recipe Special
Most taquito recipes just use ground beef. This one starts with a full roast. And that difference matters more than you’d expect.
Slow-roasting gives the beef a richness and texture that ground meat simply can’t match. The meat shreds into tender, juicy strands that soak up every bit of seasoning. Think of it like the difference between instant coffee and a properly brewed cup. Same idea, completely different experience.
Mixing in freshly grated cheddar while the meat is still warm means it melts directly into the filling. That creates a cohesive, slightly creamy interior. Not just filling with cheese scattered around, but everything fused together into something really satisfying.
The finely chopped onion adds freshness and a little bite without overpowering the beef.
And the onion soup mix? That’s my not-so-secret weapon. It infuses the braising liquid with layers of savory depth. I almost always use it. Skip it if you prefer a cleaner flavor and the taquitos will still be great. But I’d recommend trying it at least once first.
Ingredients
| Ingredient | Quantity | Notes |
|---|---|---|
| Beef roast | 5 lbs | Chuck roast works best for shredding |
| Onion soup mix | 1 packet | Optional, deepens savory flavor |
| Cheddar cheese, grated | 2 cups | Freshly grated melts better |
| Garlic powder | To taste | Start with 1 tsp, adjust as needed |
| Onion powder | To taste | Optional, enhances the onion flavor |
| Salsa or diced tomatoes (undrained) | 1½ cups / 14 oz can | Use your preferred heat level |
| Onion, finely chopped | ¼ cup | Fresh white or yellow onion |
| Corn tortillas | 48 | Warm before rolling to avoid cracking |
| Cheese sauce | To taste | Optional, for serving |
| Extra salsa | To taste | Optional, for dipping |
| Sour cream | To taste | Optional, for serving |
| Guacamole | To taste | Optional, for topping |
A Few Notes Before You Start
The Roast. Go with a chuck roast. It has enough fat and connective tissue to stay moist through a long, slow cook. Lean cuts dry out. They shred into tough, stringy strands instead of soft, juicy ones. Avoid them here.
The Tortillas. Standard 6-inch corn tortillas are the right choice. They crisp up beautifully and hold the filling well. The one non-negotiable step? Warm them properly before rolling. Cold tortillas crack every single time. No exceptions.
The Cheese. Grate it yourself. This is worth the extra two minutes. Pre-shredded cheese is coated in anti-caking powder. That coating prevents it from melting smoothly into the filling. Fresh grated cheddar melts like a dream.
Step-by-Step Cooking Method

Step 1: Cook the Roast
Preheat your oven to 325°F. Place the roast in a deep roasting pan or Dutch oven.
If you’re using onion soup mix, dissolve the packet in 1 cup of warm water and pour it over the meat. This liquid becomes your braising base. It keeps the roast moist all the way through the long cook.
Roast uncovered at 325°F for 34 to 38 minutes per pound. For a 5-pound roast, that’s roughly 3 hours to 3 hours and 10 minutes. The meat is ready when it pulls apart easily with two forks. You don’t want it just cooked through. You want it falling-apart tender.
Once done, take the pan out of the oven and let the roast cool slightly. Then transfer it to the refrigerator and chill overnight.
This step is important. Cold meat is much easier to shred finely. And resting overnight deepens the flavor all the way through the roast. Don’t skip it.
Pro Tip: Don’t throw away those pan juices. A few tablespoons stirred into the filling later adds incredible moisture and flavor. Honestly better than salsa alone.
Step 2: Shred and Season the Beef
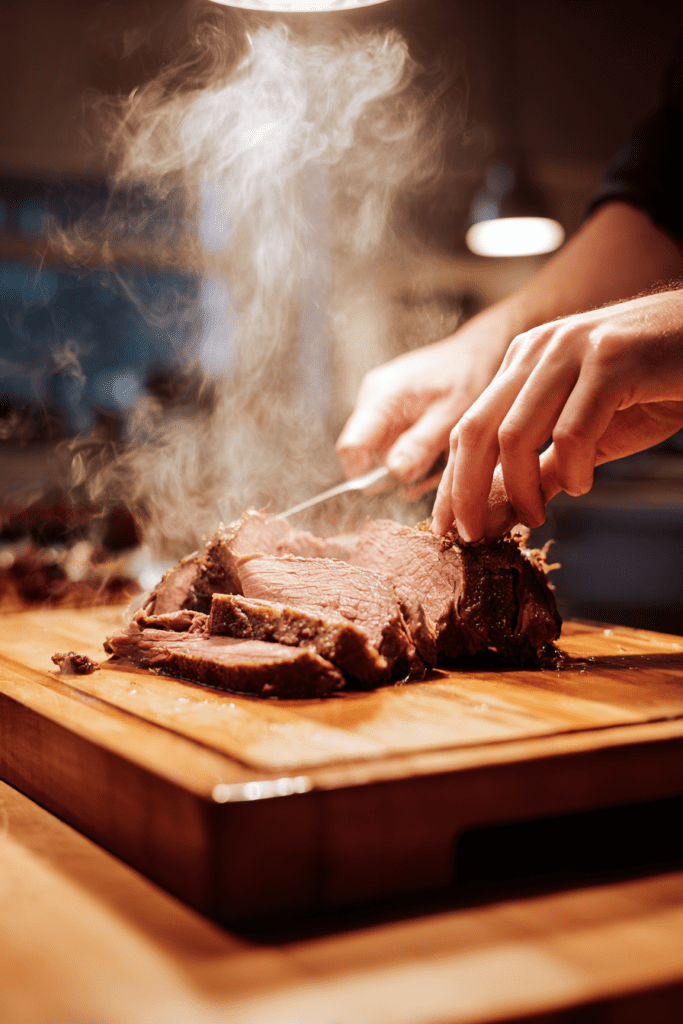
Once the roast is fully chilled, pull it out of the fridge. Using two forks or your hands, pull the meat apart into fine shreds. Toss any large pockets of fat as you go. You want lean, even strands throughout the mixture.
Transfer the shredded beef to a large mixing bowl. Add the grated cheddar cheese. Even slightly chilled meat has enough warmth to help the cheese start melting in. Then add:
- Garlic powder
- Onion powder (if using)
- Salt and pepper
- Your salsa or undrained diced tomatoes
- The finely chopped fresh onion
Mix everything thoroughly with a large spoon or your hands. The goal is a consistent filling with every ingredient evenly spread throughout. Taste it at this stage. You want it slightly bold and well-seasoned. The tortilla will absorb some of that seasoning during cooking.
Pro Tip: Filling feels too dry? Add a small amount of reserved pan juices or a splash of beef broth. Feels too wet? That will make the tortillas soggy. Add filling carefully and err on the side of less.
Step 3: Prepare and Roll the Tortillas
This is the most critical technique in the whole recipe. Cold, stiff tortillas crack the moment you start rolling. There are two reliable ways to warm them.
The fast method. Stack 8 to 10 tortillas. Wrap them in damp paper towels. Microwave for 45 to 60 seconds. They should feel soft and bend without any resistance. Keep them wrapped while you work so they stay warm.
For the crispiest results. Dip each tortilla in hot oil for about 5 to 8 seconds per side. This pre-warms the tortilla and starts the crisping process. Rolling becomes effortless and the finished taquito gets extra crunch. I use this method whenever I have the time.
To assemble:
- Lay a warm tortilla flat
- Spoon roughly ¼ cup of the beef mixture along the lower third of the tortilla
- Roll it firmly and tightly from the bottom, keeping the filling tucked in
- Place it seam-side down on a plate or baking sheet
Repeat until all your filling is used up.
Step 4: Fry or Bake
To fry: Heat an electric skillet or wide frying pan to 300°F. Cover the bottom with a shallow layer of neutral oil. Once the oil is shimmering, place the taquitos open-edge (seam side) down first. This seals the roll so it stays closed during cooking.
Fry for 2 to 3 minutes per side, turning gently with tongs until all sides are evenly golden and crispy. Work in batches. Crowding the pan drops the oil temperature and gives you soggy instead of crispy. Drain finished taquitos on a paper towel-lined plate.
To bake: Preheat the oven to 400°F. Arrange the rolled taquitos seam-side down on a greased or foil-lined baking sheet. Spray the tops lightly with cooking spray. Bake for 18 to 22 minutes until the edges are golden and the shells feel firm to the touch.
Pro Tip: If baking, flip the taquitos once at the halfway point. You’ll get even crisping on both sides instead of one soft side.
Step 5: Freeze for Later (Optional but Worth It)
If you’re making a full batch to freeze, here’s the process. Assemble all the taquitos. Lay them out seam-side down on wax paper-lined baking sheets. Slide the sheets into the freezer until each taquito is completely firm. That takes about 1 to 2 hours.
Transfer to zip-lock freezer bags. They keep well for up to 3 months.
To reheat from frozen, thaw overnight in the refrigerator and fry or bake as directed above. Or skip the thawing step entirely and bake straight from frozen. Cover with foil and bake at 400°F for 20 minutes. Remove the foil and bake another 8 to 10 minutes until heated through and crispy.
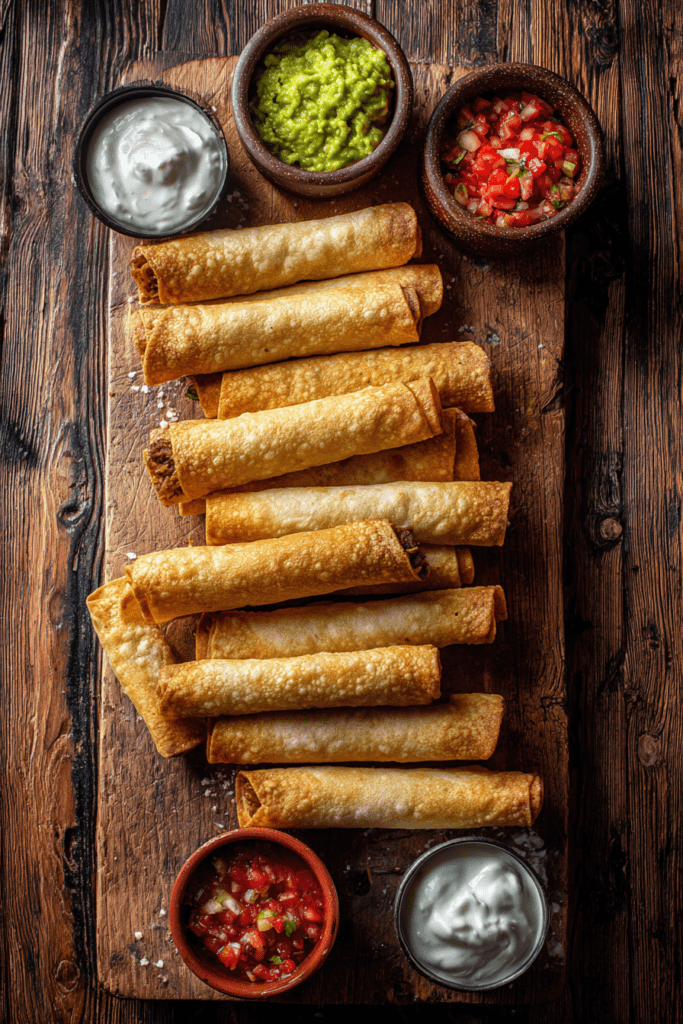
How to Serve Beef Taquitos
These taquitos work in just about any situation.
Serve them as a casual weeknight dinner next to a simple green salad or a bowl of rice. Line them up on a big platter as a party appetizer. Pack a few in a container for a grab-and-go lunch that actually tastes good.
For toppings, set out:
- Sour cream for cooling creaminess
- Fresh chunky salsa for brightness and acidity
- Guacamole for richness
- Warm cheese sauce if you want something more indulgent
Put everything in small bowls and let people build their own plate. It turns dinner into something fun.
Variations Worth Trying
Add beans. Stir in one or two cans of drained black beans, or a can of refried beans, directly into the filling. It stretches the recipe further and adds a hearty, earthy quality that pairs really well with the beef.
Add corn. A drained can of sweet corn mixed into the filling adds color, sweetness, and texture. It’s a great family-friendly twist that balances the savory beef without changing the overall flavor.
Swap the cheese. Monterey Jack, pepper jack, or a Mexican cheese blend all work as substitutes for cheddar. Pepper jack is my personal favorite swap. It adds a gentle heat without needing any extra seasoning.
Use flour tortillas. Flour tortillas are easier to roll without cracking and produce a slightly chewier shell. Technically these become flautas rather than taquitos, but the flavor and technique are identical. Either one works beautifully here.
Swap the protein. This recipe works just as well with shredded pork shoulder or shredded chicken thighs. The seasoning blend transfers naturally to both proteins. No adjustments needed.
Frequently Asked Questions
Q: Can I use ground beef instead of a whole roast?
Absolutely. Brown 1 to 2 lbs of ground beef with finely diced onions. Drain the grease. Season just as you would the shredded roast. You can even stir in a can of refried beans for extra body and richness.
Q: Why do my corn tortillas keep cracking when I roll them?
The most common cause is cold or dry tortillas. Warm them thoroughly before rolling. Either dip them briefly in hot oil for 5 to 10 seconds per side, or microwave a stack between damp paper towels. Roll them immediately while they’re still warm and pliable.
Q: Can I make these ahead and freeze them?
Yes. Assemble them fully. Lay them seam-side down on a lined baking sheet and freeze until solid. Transfer to zip-lock freezer bags for up to 3 months. To reheat, thaw and fry in hot oil. Or bake straight from frozen at 400°F covered with foil, then uncover for the last 5 to 10 minutes.
Q: Can I bake these instead of frying?
Definitely. Arrange the rolled taquitos seam-side down on a greased baking sheet. Spray the tops with cooking spray. Bake at 400°F for 15 to 20 minutes until the edges are golden and crisp.
Q: What can I substitute for salsa in the filling?
A 14-ounce can of diced tomatoes (undrained) works perfectly as a direct swap. You can also use a few tablespoons of the beef cooking juices from the roasting pan. It keeps the meat moist without adding any extra tomato flavor.
Enjoy your homemade beef taquitos. They’re even better the next day. If any survive that long.
Crispy Beef Taquitos
Ingredients
For the Roast
- 5 lbs chuck roast best for shredding
- 1 packet onion soup mix optional, deepens savory flavor
- 1 cup warm water to dissolve soup mix
For the Filling
- 2 cups cheddar cheese freshly grated
- 1 tsp garlic powder adjust to taste
- onion powder optional, to taste
- salt and pepper to taste
- 1 1/2 cups salsa or diced tomatoes undrained, use preferred heat level
- 1/4 cup onion finely chopped, white or yellow
For Assembly
- 48 corn tortillas 6-inch, warmed before rolling
- neutral oil for frying or greasing baking sheet
Optional Toppings
- sour cream
- salsa extra, for dipping
- guacamole
- cheese sauce warm, for drizzling
Instructions
- Preheat oven to 325°F. Place the chuck roast in a deep roasting pan or Dutch oven. Dissolve the onion soup mix packet in 1 cup of warm water and pour over the meat.
- Roast uncovered at 325°F for 34 to 38 minutes per pound — about 3 hours to 3 hours 10 minutes for a 5-lb roast. The meat is ready when it pulls apart easily with two forks.
- Remove from oven and let the roast cool slightly. Transfer to the refrigerator and chill overnight. Reserve the pan juices — you’ll use them in the filling.
- Once fully chilled, shred the roast with two forks or your hands into fine, even strands. Discard any large fat pockets.
- Transfer shredded beef to a large mixing bowl. Add the grated cheddar, garlic powder, onion powder, salt and pepper, salsa or diced tomatoes, and finely chopped onion. Mix thoroughly until the filling is consistent and well-seasoned. Add a splash of reserved pan juices if the filling feels too dry.
- Warm the tortillas before rolling. Microwave a stack of 8 to 10 wrapped in damp paper towels for 45 to 60 seconds, or dip each tortilla in hot oil for 5 to 8 seconds per side for extra crispiness. Keep them wrapped while you work.
- Lay a warm tortilla flat. Spoon about ¼ cup of filling along the lower third. Roll firmly from the bottom, keeping the filling tucked in, and place seam-side down on a baking sheet. Repeat with remaining tortillas and filling.
- To fry: Heat oil in a skillet to 300°F. Place taquitos seam-side down first to seal. Fry in batches for 2 to 3 minutes per side until golden and crispy. Drain on paper towels.
- To bake: Preheat oven to 400°F. Arrange taquitos seam-side down on a greased baking sheet. Spray tops with cooking spray. Bake 18 to 22 minutes, flipping once halfway through, until golden and firm.
- Serve immediately with sour cream, salsa, guacamole, or cheese sauce on the side.