
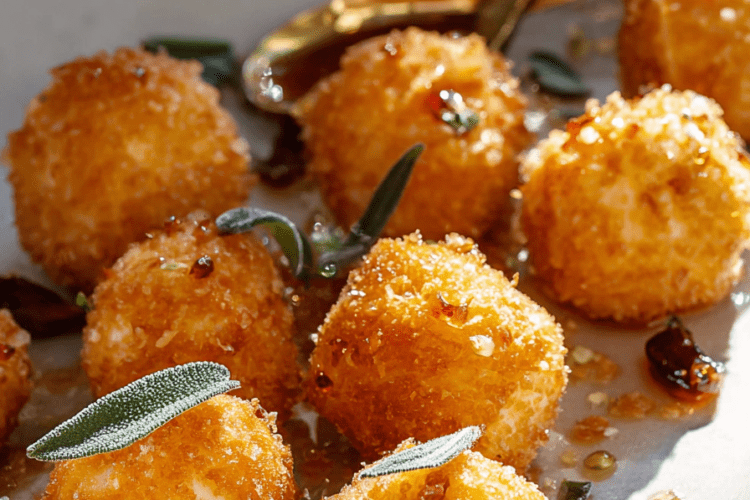
Crispy outside. Creamy inside. Drizzled with a spicy honey that people literally cannot stop talking about.
| Prep Time | Cook Time | Total Time | Servings |
|---|---|---|---|
| 10 minutes | 15 minutes | 25 minutes | 4–6 servings |
Why This Appetizer Is Completely Irresistible
Some appetizers fill a plate. Others stop a conversation dead in its tracks.
This one does the second thing every single time.
Picture walking into a room carrying a platter of warm, golden cheese balls crusted in sesame seeds and panko. People turn around. Someone asks what that smell is. Then the honey comes out. You drizzle it slow and warm, infused with fresh sage and a real kick of heat. The room gets quiet for a second. That good kind of quiet.
I first made these on a cold winter night for a small group of friends. I set the platter down and literally did not get a single one for myself. Gone. Before I even grabbed a napkin.
That was the night this recipe became my permanent go-to.
Here’s what I love most about it. You need one log of goat cheese, a few pantry items, and about 25 minutes. That’s it. The result looks like something from a restaurant that takes reservations two weeks out.

What Makes the Spicy Sage Honey So Special
Let me be straight with you. The cheese balls alone are already really good.
But the spicy sage honey? That’s the part people ask about on the way home.
It’s built from three simple things warmed together in a small pot:
- Fresh sage leaves for that floral, earthy depth
- A grated garlic clove for quiet savory warmth underneath
- Hot sauce for the kind of heat that sneaks up slowly
The honey ties it all together. Sweet on the front, herby in the middle, spicy at the end. It hits the tangy goat cheese like a perfect match. You will want to put this honey on everything.
Ingredients You Will Need
Here’s a full breakdown before we get started:
| Ingredient | Quantity | Notes |
|---|---|---|
| All-purpose flour | 1/3 cup | For initial coating |
| Black pepper | Pinch | Freshly cracked preferred |
| Panko breadcrumbs | 1 cup | Japanese-style for best crunch |
| Sesame seeds | 1/3 cup | White or mixed |
| Large egg, beaten | 1 | Helps coating adhere |
| Goat cheese log | 10 oz | Plain, chilled |
| Avocado oil | 1–2 inches | For frying; high smoke point |
| Honey | 1/2 cup | Pure, unflavored |
| Garlic clove, grated | 1 clove | Fresh only |
| Hot sauce | 2–3 tbsp | Adjust to taste |
| Fresh sage leaves | 1/4 cup | Dried won’t work here |
| Sea salt | To taste | Flaky salt for finishing |
Pro Tip: Before you do anything else, take your goat cheese out of the fridge and stick it straight in the freezer for 15 minutes. Cold cheese is firmer, easier to roll, and holds its shape way better when coating. Do not skip this.
Step-by-Step Instructions
One thing to know before you start: once the oil is hot, this recipe moves fast. Get everything prepped, lined up, and ready before you touch the stove. Read the steps once through first. It’ll make the whole process feel easy.
Step 1: Set Up Your Breading Station
You need three shallow bowls in a row. Think assembly line, not chaos.
- Bowl 1: Add the 1/3 cup flour plus a generous pinch of black pepper. Give it a quick stir.
- Bowl 2: Crack in your egg and beat it until the yolk and white are fully mixed together.
- Bowl 3: Pour in the 1 cup of panko breadcrumbs and the 1/3 cup of sesame seeds. Stir until evenly combined.
Put a parchment-lined plate or small baking sheet at the end of the line. That’s where the coated balls park before hitting the freezer.
Step 2: Shape the Goat Cheese Balls
Grab your chilled goat cheese log and start pinching off pieces. Each ball should be about 1 tablespoon, roughly the size of a large marble. You’ll end up with 20 to 24 balls total.
Roll each piece between your palms until it’s a smooth, compact little sphere. Work fast. Your hands are warm and the cheese will soften quickly. If things start getting sticky and messy, run your hands under cold water, dry them off, and keep going.
Pro Tip: Slightly damp hands are actually your friend here. A little moisture stops the cheese from sticking to your palms and gives you a cleaner, rounder shape.
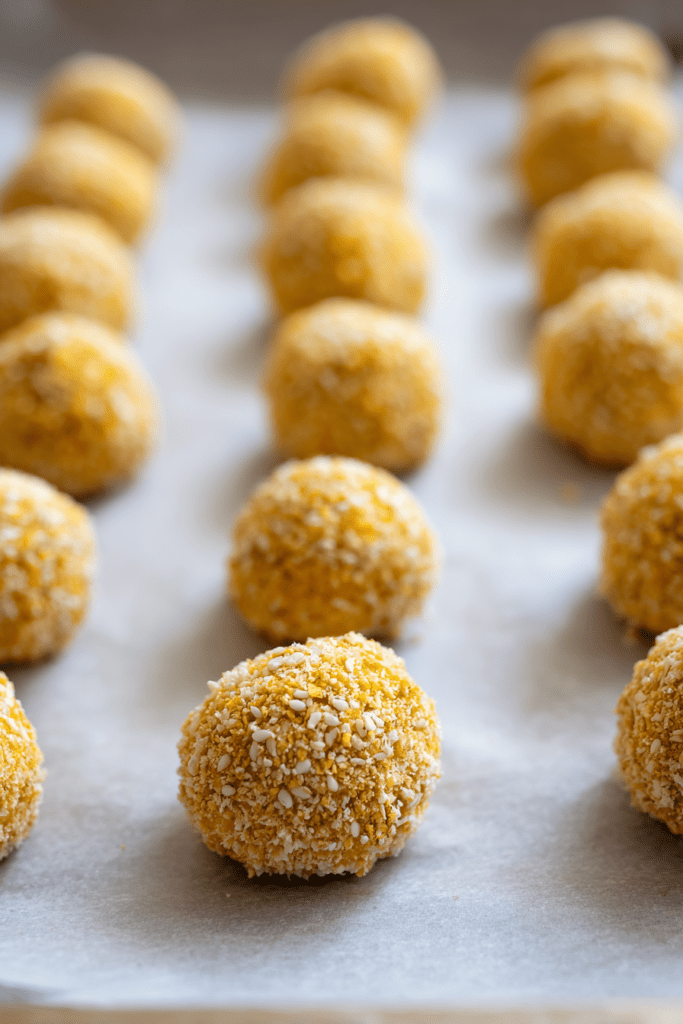
Step 3: Coat and Freeze
This step is where the magic happens. It’s also the step that most people skip or rush, and then wonder why their cheese balls fell apart.
Work one ball at a time:
- Drop it into the flour bowl. Roll it around gently until all sides are coated. Tap off any extra.
- Move it to the egg bowl. Rotate until it’s fully covered. Let the drips fall back before moving on.
- Roll it through the panko-sesame bowl. Press lightly so the crumbs really grip the surface.
- Set it on the parchment-lined plate. Then repeat with the rest.
Once they’re all coated, slide that plate into the freezer. Leave them there for at least 20 minutes. This is not optional. The freezer is what stops the cheese from melting straight through the crust the second it hits hot oil. Think of it like setting concrete before you paint it.
Make-ahead option: The coated balls can sit in the freezer overnight. Fry them straight from frozen whenever you’re ready. No thawing needed.
Step 4: Make the Spicy Sage Honey
While the cheese balls are in the freezer, make the honey. It takes about 5 minutes and makes the whole kitchen smell incredible.
In a small saucepan over low to medium-low heat, combine:
- 1/2 cup honey
- 1 grated garlic clove
- 2 to 3 tablespoons of hot sauce
- 1/4 cup fresh sage leaves
Stir gently and let it warm through slowly. You want small lazy bubbles around the edges. A gentle simmer. Not a boil, not even close. High heat makes honey grainy and ruins the texture.
Let it sit and infuse for 4 to 5 minutes, then pull it off the heat. The sage leaves will have gone soft and silky. They’ve done their job, releasing all that herbal goodness into the honey.
Pro Tip: Leave those softened sage leaves right in the honey when you serve. They look beautiful draped over the cheese balls and taste even better.
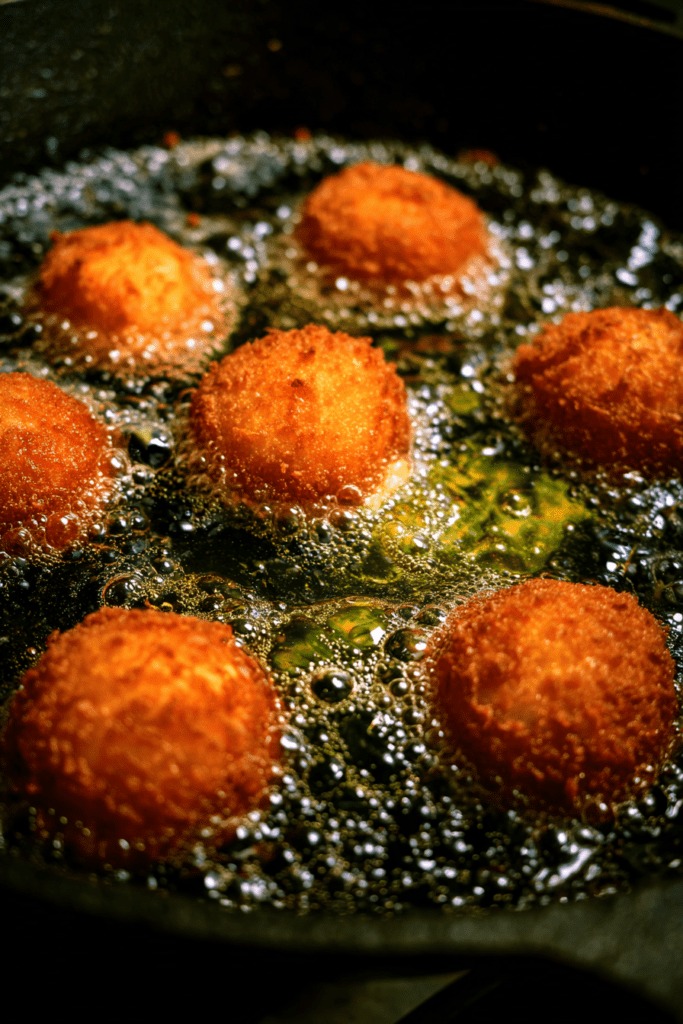
Step 5: Fry to Golden Perfection
Pour 1 to 2 inches of avocado oil into a skillet with high sides. Heat it over medium-high.
Not sure if it’s ready? Drop a single panko crumb in. If it sizzles right away and starts turning golden within about 10 to 15 seconds, you’re good to go. If it just sinks and sits there doing nothing, give it another minute.
Fry your cheese balls in batches of 4 to 6. Do not pile them all in at once. Overcrowding drops the oil temperature and you end up with pale, greasy coating instead of a crispy golden shell. It’s like trying to toast too much bread at once. The results are disappointing.
Each batch needs 1 to 2 minutes total. Turn the balls once or twice so every side gets that deep, even golden color. The moment you see good color, pull them out.
Important: Do not leave them in the oil past 2 to 3 minutes. The cheese inside heats up fast. Leave it too long and the crust cracks. The filling leaks. The whole thing falls apart in the oil. Pull them early, not late.
Set each finished batch on a plate lined with paper towels to absorb any extra oil. This keeps the exterior crispy instead of soggy.
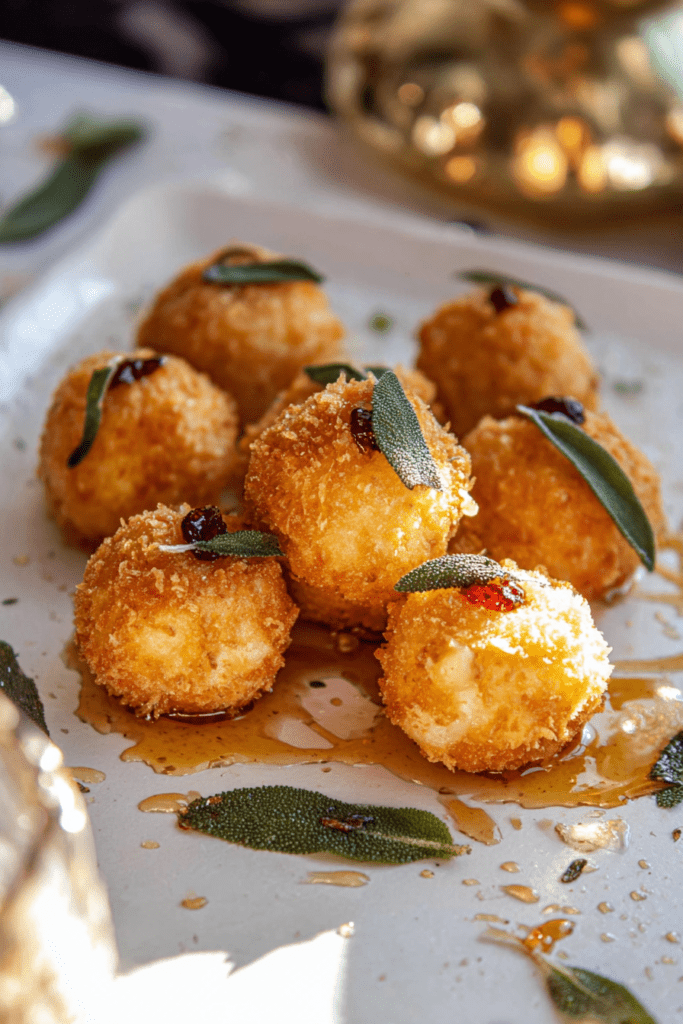
Step 6: Plate and Serve
Arrange all the fried cheese balls on a serving platter. Drizzle the warm spicy sage honey generously over the top. Don’t be shy with it. Then scatter a pinch of flaky sea salt across the whole platter.
Serve immediately. The contrast of crispy outside, soft melty inside, and warm fragrant honey is at its absolute best within the first few minutes. Like most good things, it doesn’t wait around.
These also work beautifully:
- Over a simple green salad
- Alongside a small bowl of warmed tomato sauce for dipping
- On a sharing board with fresh herbs and extra flaky salt
Tips, Substitutions & FAQs
Helpful Tips for the Best Results
Keep everything cold before frying. The colder the cheese going into the oil, the better it holds together. If your kitchen is warm or it’s a hot day, work in small batches and put the unfried balls back in the freezer between rounds. Cold cheese, hot oil. That’s the formula.
Use a thermometer if you have one. Oil between 350 and 375°F is your sweet spot. Too cool and the coating soaks up oil. Too hot and it burns before the cheese warms through.
Double coat for extra crunch. Run each ball through the full flour, egg, and panko sequence twice. The crust gets noticeably thicker and crunchier. Worth the extra two minutes.
Use a small saucepan for frying. A narrower pot uses less oil while still giving you enough depth to fry properly. Less waste, same results.
Use a spider strainer or slotted spoon. These make it easy to lower and lift the balls without splashing hot oil or dropping them at the wrong angle.
Substitutions & Variations
No avocado oil? Vegetable oil, canola oil, or grapeseed oil all do the job. Just pick something neutral with a high smoke point. Olive oil is not a good choice here.
Prefer herbed goat cheese? Go for it. A garlic-and-herb log adds a nice extra layer of flavor without changing a single thing about the method.
Want a nuttier coating? Swap out half the sesame seeds for finely crushed pistachios or pecans. Different texture, a little richer flavor.
No hot sauce? Stir some red pepper flakes directly into the warm honey instead. Start with about 1/2 teaspoon and taste as you go.
Rather bake than fry? Arrange the frozen coated balls on a parchment-lined tray, spray generously with cooking oil, and bake at 450°F for 7 to 9 minutes until golden. Or air fry at 375°F for 7 to 10 minutes. Both work well and are a lot less hands-on.
Frequently Asked Questions
Can I make these ahead of time?
Yes, and honestly it makes things easier. After coating the balls in the panko mixture, freeze them on the parchment-lined plate. They’ll keep in the freezer for up to 24 hours. When you’re ready, fry them straight from frozen. Just add an extra 30 to 60 seconds to the cook time and you’re good.
Why did my cheese balls crack open during frying?
Almost always one of two things. Either the oil was too hot and cooked the outside too fast, or the cheese wasn’t frozen solid enough before it hit the oil. Both have the same fix: make sure the oil stays between 350 and 375°F, and always freeze the coated balls for at least 20 minutes before frying.
Can I use a different type of cheese?
You can try. Brie is the closest substitute since it has a similar soft, creamy texture. Feta is too dry and crumbly. Cream cheese is too soft and tends to ooze out no matter what you do. Goat cheese is still the best pick here. Its tanginess, texture, and ability to hold shape when cold make it the right tool for this job.
How should I store and reheat leftovers?
Pop them in an airtight container and refrigerate for up to 3 days. To reheat, spread them on a baking sheet and warm in a 350°F oven for 5 to 8 minutes. Skip the microwave entirely. It turns the coating soft and the cheese rubbery. The oven brings them back properly.
Can the spicy sage honey be made in advance?
Absolutely. Store it in a small jar at room temperature for up to one week. When you’re ready to use it, gently reheat it on the stovetop over low heat and stir before drizzling. Here’s a little bonus: the flavors actually get better after sitting overnight. The sage and garlic deepen and mellow. Day two honey is genuinely superior.
If you make this recipe, drop a comment below. I’d love to hear how yours turned out and what you ended up serving them with.

Fried Goat Cheese Balls with Spicy Sage Honey
Ingredients
Goat Cheese Balls
- 10 oz goat cheese log plain, chilled
- 1/3 cup all-purpose flour
- 1 pinch black pepper freshly cracked preferred
- 1 large egg beaten
- 1 cup panko breadcrumbs Japanese-style for best crunch
- 1/3 cup sesame seeds white or mixed
- 1-2 inches avocado oil for frying, high smoke point
- sea salt flaky, for finishing
Spicy Sage Honey
- 1/2 cup honey pure, unflavored
- 1 garlic clove grated, fresh only
- 2-3 tbsp hot sauce adjust to taste
- 1/4 cup fresh sage leaves dried won’t work here
Instructions
- Place the goat cheese log in the freezer for 15 minutes before starting. Cold cheese is firmer, easier to roll, and holds its shape better when frying.
- Set up a three-bowl breading station. Bowl 1: flour and black pepper. Bowl 2: beaten egg. Bowl 3: panko breadcrumbs and sesame seeds. Place a parchment-lined plate at the end of the line.
- Pinch off 1-tablespoon pieces of chilled goat cheese and roll each into a smooth, compact ball. You should get 20 to 24 balls total. Work quickly — if the cheese softens, rinse your hands under cold water and continue.
- Coat each ball one at a time: roll in flour, dip in egg, then press through the panko-sesame mixture. Set each coated ball on the parchment-lined plate. Once all are coated, place the plate in the freezer for at least 20 minutes.
- While the cheese balls freeze, make the spicy sage honey. In a small saucepan over low to medium-low heat, combine honey, grated garlic, hot sauce, and fresh sage leaves. Stir gently and let it simmer — small lazy bubbles only, never a full boil. Infuse for 4 to 5 minutes, then remove from heat. Leave the sage leaves in the honey when serving.
- Pour 1 to 2 inches of avocado oil into a deep skillet and heat over medium-high. Test readiness by dropping in a single panko crumb — it should sizzle and turn golden within 10 to 15 seconds. Ideal oil temperature is 350–375°F.
- Fry the cheese balls in batches of 4 to 6. Do not overcrowd the pan. Fry for 1 to 2 minutes per batch, turning once or twice for even color. Pull them out the moment they are deep golden — do not exceed 2 to 3 minutes or the cheese will leak. Drain on a paper towel-lined plate.
- Arrange the fried cheese balls on a serving platter. Drizzle generously with warm spicy sage honey, finish with a pinch of flaky sea salt, and serve immediately.