
Last month, I made French onion soup from scratch for my family.
And oh my goodness.
As those onions started cooking, the most incredible smell filled my entire kitchen. My neighbor actually knocked on the door to ask what I was making. That’s how good it smelled.
Here’s the thing about caramelized onions. They’re basically kitchen magic. You take these sharp, pungent onions and transform them into something sweet and silky. Almost like alchemy.
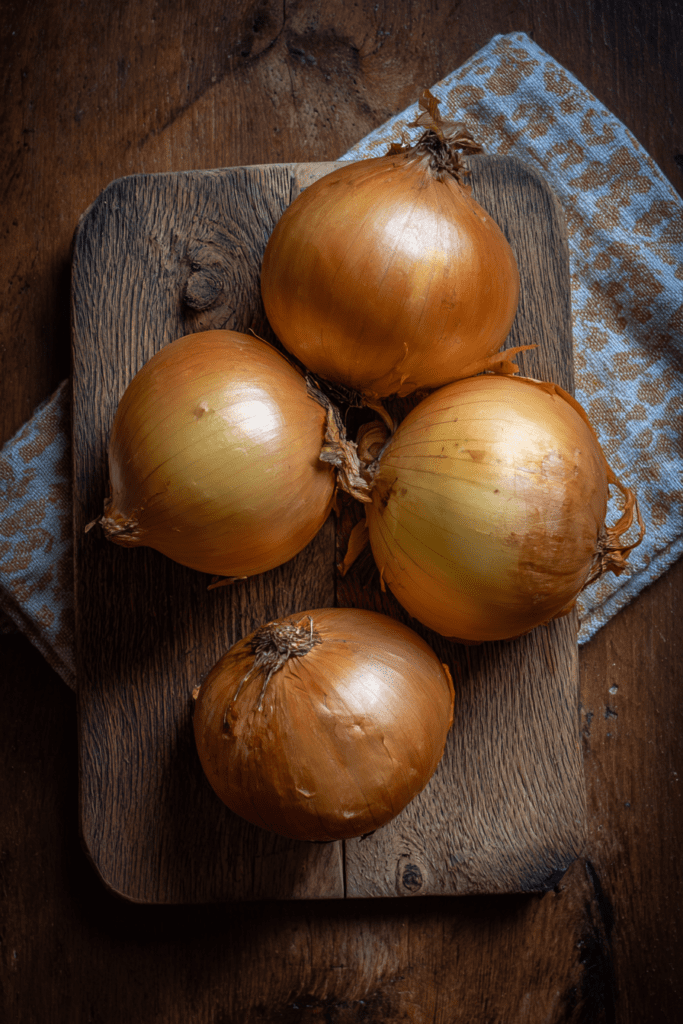
Image Prompt 1: Fo
ur whole yellow onions with papery golden skins arranged on a rustic wooden cutting board
I need to be straight with you, though.
This isn’t quick. You’ll need at least 50 minutes. Sometimes longer. But every single minute? Totally worth it.
The best part? You only need three ingredients:
- Yellow onions (the sweetness comes naturally)
- Quality olive oil (for cooking)
- A pinch of salt (brings everything together)
Why This Recipe Actually Works
Here’s the secret: slow, gentle heat.
Crank up the temperature and you’ll burn them before they caramelize. Keep it low and those natural sugars develop gradually. That’s where the sweet, complex flavor comes from.
You’ve probably seen recipes promising “quick caramelized onions” in 15 minutes. Can I tell you something? Those are just browned onions. Not the same thing at all.
Real caramelization takes time. The sugars need to break down completely.
I learned this the hard way. My first attempt was a complete disaster. I got impatient and cranked up the heat, thinking I could save time. The result? Bitter, burnt onions that went straight into the trash. Not my finest cooking moment.
The Equipment Really Matters
Your pan choice makes a huge difference here.
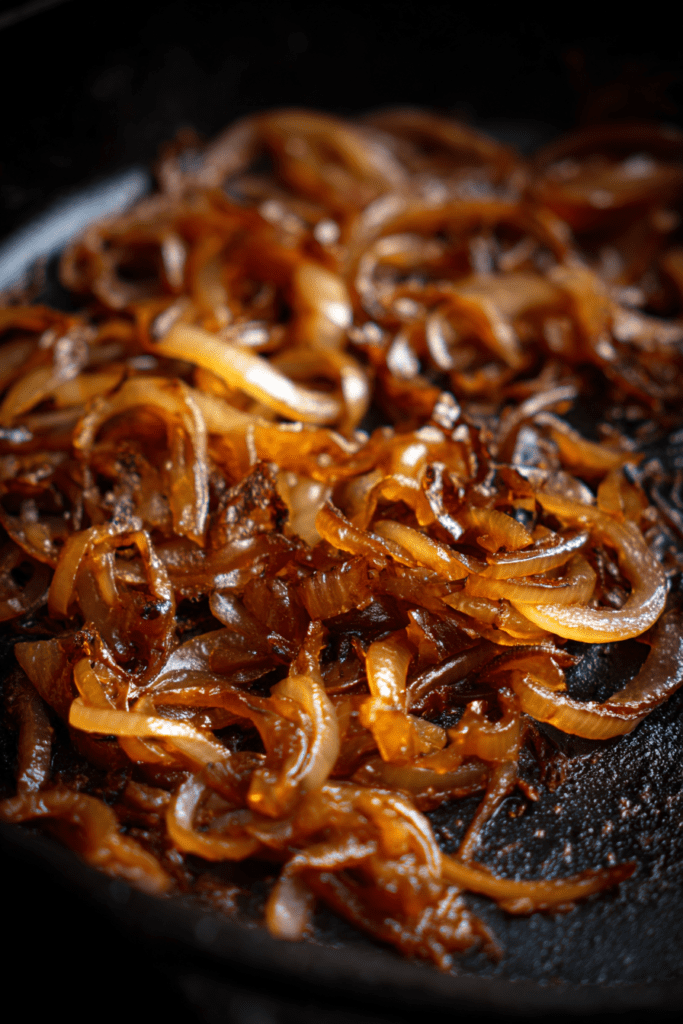
I always use my cast-iron skillet. Non-stick pans? Great for scrambled eggs. But not ideal for this.
Here’s why cast iron wins: It develops what chefs call “fond.” Those are the caramelized bits that stick to the bottom of your pan. When you scrape them up and mix them back in? Pure flavor gold.
Pan size matters too. For four onions, you need a 12-inch skillet.
Smaller pans crowd the onions. And here’s what happens: Onions release moisture as they cook. That moisture needs room to evaporate. Otherwise you’re steaming them instead of caramelizing them.
Make Extra (Trust Me On This)
Here’s my best advice: Make a big batch.
Think about it. If you’re already spending an hour at the stove, why not maximize your effort?
Caramelized onions store beautifully in the fridge. They’ll stay fresh for a full week.
Want them to last even longer? Freeze them.
I use ice cube trays for portioning. One cube = one serving. Need some for dinner? Just pop out what you need.
This has saved my weeknight dinners so many times. A simple grilled cheese becomes restaurant-worthy. Just like that.
The versatility blows my mind every time:
- Pasta gets instant richness
- Soups develop deeper flavors
- Even breakfast eggs taste extraordinary
Once you get this technique down, you’ll find yourself using them everywhere.
The Recipe
Prep Time: 5 minutes | Cook Time: 50-80 minutes | Total Time: 55-85 minutes
Servings: 8 | Difficulty: Easy
What You’ll Need
| Ingredient | Quantity | Notes |
|---|---|---|
| Extra-virgin olive oil | 2 tablespoons | High-quality makes a difference |
| Yellow onions | 4 medium | Halved and sliced |
| Sea salt | ½ teaspoon | Adjust to your taste |
Let’s Get Cooking
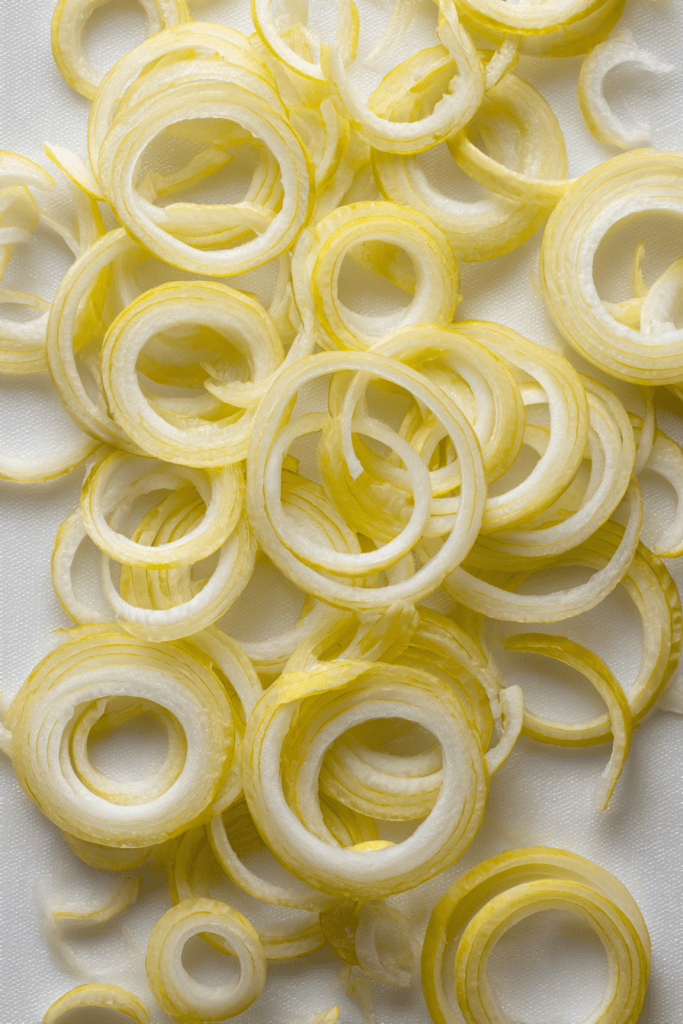
Step 1: Slice Those Onions
Cut your onions into even slices. Consistency really matters here.
Why? Uniform slices cook at the same rate. I go for about ¼-inch thickness.
After slicing, pull apart the onion rings. They stick together naturally. Spread them out for even cooking.
Step 2: Start the Heat
Pour your olive oil into the cast-iron skillet. Turn the heat to medium. Wait for the oil to shimmer slightly.
Now add all your sliced onions at once.
Don’t panic when you see the huge pile. Onions shrink dramatically as they cook. Seriously, they’ll reduce to about a quarter of their original size.
Stir everything to coat the onions with oil.
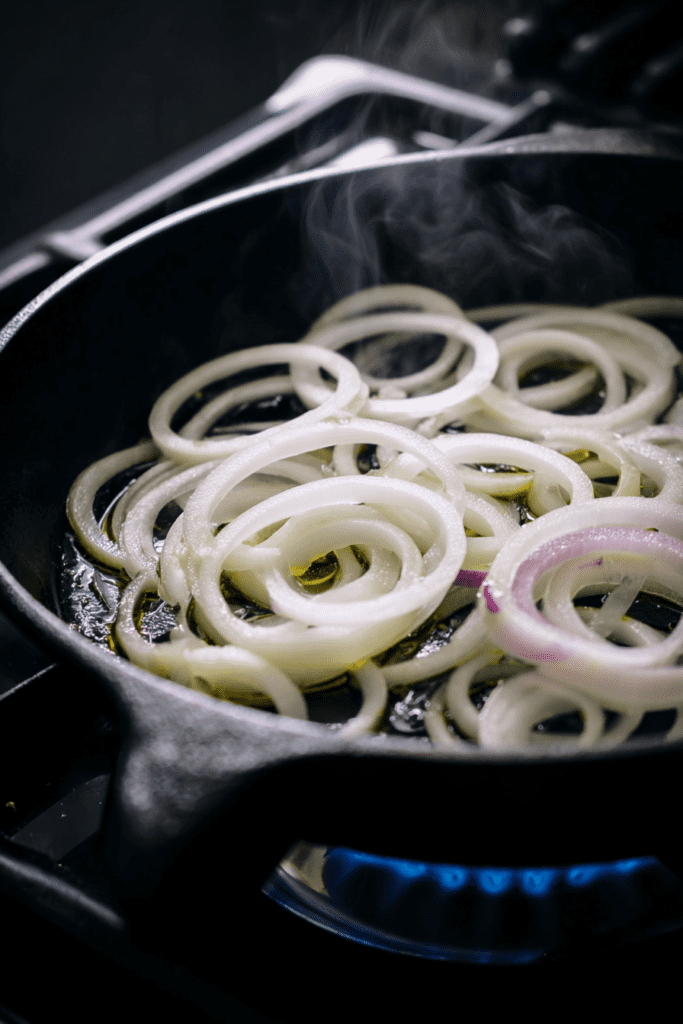
Step 3: The First Five Minutes
Keep stirring frequently for five minutes. You’ll see them start to soften. They become more translucent too.
After these first five minutes, add the salt. Salt does two things: It draws out moisture and it boosts flavor. Stir it in well.
Step 4: The Long Wait (This Is Where Magic Happens)
Reduce your heat to medium-low.
And now? We wait. The onions will cook for 50 to 80 minutes.
I know. It seems like forever. But this is where the transformation happens.
Stir every few minutes. Don’t walk away completely. Check on them regularly.
Here’s what to watch for:
- Onions sticking hard to the pan? Lower the heat
- Pan looking dry? Add a tablespoon of water
- This technique is called “deglazing” and it’s your best friend
Step 5: The Final Push
Around the 50-minute mark, take a good look at your onions.
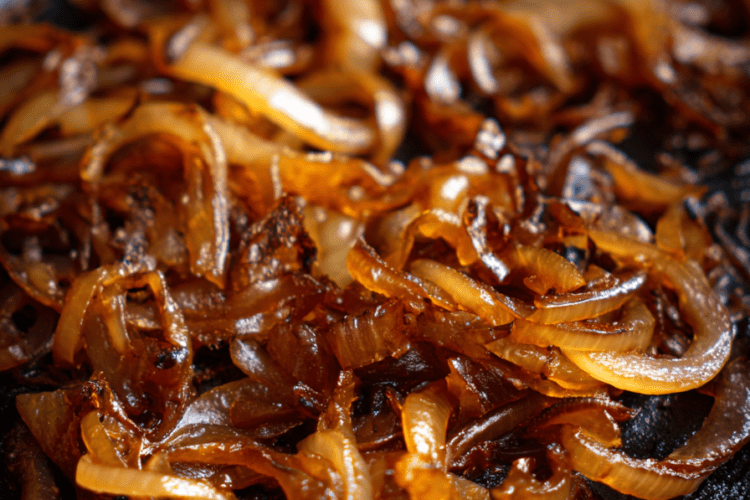
They should be way smaller now. The color shifts from pale yellow to beautiful golden brown.
Not quite deep enough? Bump up the heat slightly. But stay right there and stir constantly. The higher heat speeds up that final caramelization.
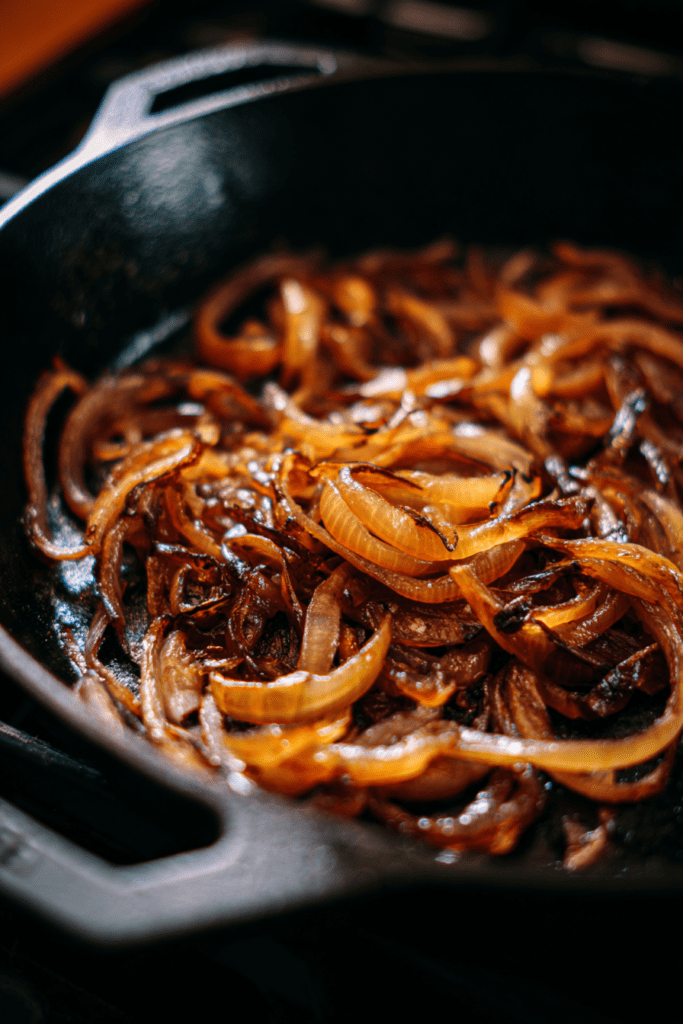
How To Know They’re Done
Perfect caramelized onions look and feel specific:
The color? Deep golden to light brown. The texture? Silky and jam-like. The volume? Reduced to about one-quarter of what you started with.
Taste a tiny bit (careful, they’re hot!). You should taste natural sweetness. No harsh, raw onion flavor at all. If you still taste that bite, keep cooking.
Storing & Using Your Creation
Use them warm if you can. They’re amazing on:
- Burgers and sandwiches
- Stirred into creamy dips
- Topped on steaks or roasted veggies
Need to store them? Let them cool completely first. Put them in an airtight container. They’ll keep in the fridge for up to a week.
For freezing: Use ice cube trays for portions. Once they’re frozen solid, transfer the cubes to freezer bags. They’ll last two months this way.
My Go-To Uses
Every weekend, I fold them into omelets. Game changer.
They make the best pizza toppings. I also stir them into mashed potatoes. My family practically fights over them on grilled cheese.
And in pasta dishes? Forget about it. They add incredible depth. Same with vegetable soups and savory tarts.
The possibilities really are endless.
Tips That Actually Help
Tip #1: Patience Wins
The biggest mistake? Rushing.
I get it. We’re all busy. But trying to speed this up just gives you burnt onions. Keep that heat low and steady. Trust the process.
Tip #2: Pan Selection Matters
Cast iron gives you the best results because of that flavorful fond.
Only have stainless steel? That works too. Just avoid non-stick if you can. It prevents the browning we’re after.
Tip #3: Knife Skills Pay Off
Take your time slicing. Even cuts = uniform cooking.
Thick pieces stay crunchy. Thin pieces burn. Find that middle ground.
Tip #4: Water Is Your Friend
Pan getting too dry? Add water, one tablespoon at a time.
This saves you from burning and helps scrape up that fond. The water evaporates fast, leaving concentrated flavor behind.
Want To Mix It Up?
Sweet and Tangy: Add a tablespoon of balsamic vinegar in the last five minutes. Creates this amazing sweet-tart thing.
Herb-Infused: Throw in fresh thyme sprigs while cooking. Pull them out before serving. The herbs add subtle aromatic notes.
Color Play: Mix yellow onions with red onions. Looks beautiful and adds flavor complexity.
When Things Go Wrong
Problem: Onions burning before they caramelize
Fix: Drop the heat right away. Add some water. Stir more often.
Problem: Still pale after 60 minutes
Fix: Bump the heat up a bit. Check your pan size. Make sure you’re not crowding them.
Problem: They’re watery, not jammy
Fix: Keep cooking. The moisture has to evaporate completely. Be patient here.
Your Questions Answered
Can I use red onions instead?
Yep! Red onions work great. Similar sugar content. The color comes out a bit different, but the flavor? Sweet and delicious.
How do I know they’re actually done?
Look for deep golden-brown color. Silky, jam-like texture. And they should taste sweet with no harsh bite. They’ll shrink to about 75% less than what you started with.
Can I make these before a party?
Absolutely. Here’s a secret: They taste better after a day. Make them up to a week ahead. Store them in the fridge. Reheat gently when you’re ready.
Best way to reheat frozen ones?
Toss them straight into hot dishes while still frozen. For eating alone, microwave in 30-second bursts. Or warm them in a small skillet over low heat with a splash of water.
Why does cooking time vary so much?
Lots of reasons:
- Pan size affects how moisture evaporates
- Every stove heats differently
- Onion moisture varies by variety and age
- Start checking at 50 minutes, but don’t stress if yours take longer
Here’s The Bottom Line
Learning to caramelize onions properly opens up so many possibilities in your cooking.
Yes, it takes time. But the payoff? Completely worth it.
These sweet, golden strands add restaurant-level flavor to your home cooking. Start with this basic recipe. Get comfortable with the technique. Then experiment with your own variations.
Pretty soon, you’ll wonder how you ever cooked without them.
Your kitchen will smell incredible. Your food will taste amazing. And your family will keep asking when you’re making them again.
Now get in that kitchen and make some magic happen!
How to Caramelize Onions
Ingredients
- 2 tablespoons extra-virgin olive oil high-quality makes a difference
- 4 yellow onions medium, halved and sliced
- 1/2 teaspoon sea salt adjust to your taste
Instructions
Slice Those Onions
- Cut your onions into even slices about ¼-inch thickness. Consistency really matters here for uniform cooking. After slicing, pull apart the onion rings and spread them out.
Start the Heat
- Pour olive oil into a 12-inch cast-iron skillet. Turn the heat to medium and wait for the oil to shimmer slightly.
- Add all your sliced onions at once. Don’t panic at the huge pile – onions will reduce to about a quarter of their original size. Stir everything to coat the onions with oil.
The First Five Minutes
- Keep stirring frequently for five minutes until onions start to soften and become more translucent.
- After these first five minutes, add the salt. Stir it in well to draw out moisture and boost flavor.
The Long Wait (This Is Where Magic Happens)
- Reduce your heat to medium-low. Cook the onions for 50 to 80 minutes, stirring every few minutes. Don’t walk away completely.
- If onions stick hard to the pan, lower the heat. If the pan looks dry, add a tablespoon of water to deglaze and scrape up the flavorful fond.
The Final Push
- Around the 50-minute mark, check your onions. They should be much smaller with color shifting from pale yellow to beautiful golden brown.
- If not deep enough, bump up the heat slightly and stir constantly. The higher heat speeds up that final caramelization. Continue until onions are deep golden to light brown, silky and jam-like in texture.